Why ABAP/4 Queries?
Many times a need arises for SAP Users and Functional Consultants to generate quick reports without getting any ABAP coding done – time taken to complete the coding in development, transport and test it in QA system and then transport to production – is sometimes too long. In such cases, ABAP/4 query is a tool provided by SAP for generating these kind of reports.
This document aims at explaining the concept of ABAP/4 query in a simple and straight forward manner. The reader of this document should have a moderate knowledge of ABAP concepts and authorizations for understanding the concept of ABAP query.
ABAP/4 query can be designed in three steps
1. Creation of a user group
2. Creation of Infoset
3. Creation of the query based on Infoset
By executing the transaction codes mentioned below
· SQ01 ABAP/4 Query
· SQ02 Infoset/Functional Area
· SQ03 User group
First go to T.code : SQ03
Then Create a User Group “HARUGRP” by clicking the Create Button. Display of the User Group created is displayed below

Now click on Assign Users for the User Group “HARUGRP” by clicking the button “Assign Users & Infosets”.
Note: After Assigning click the Save Button
To know the Users settings click on the “Description” button in the main screen you can get the details.
Now go to T.Code : SQ02
Initial Screen of SQ02 is displayed below, Then mention the infoset name “HARISET”
And press create button.
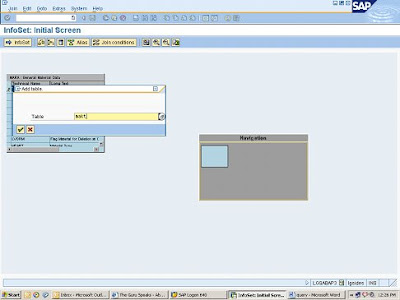
Once you click the Create button the below screen appears in that give the description for the Info Set Created. Secondly on the data source if you want to Join SAP Tables then click the first option & then enter the first table
In my example I am planning to join MARA & MAKT hence I have entered table name MARA first.

Press ok.
After inserting the below screen appears. Now check the Status of Joining the Tables MARA & MAKT.But, by default join condition are done if we take two tables and if we take more than two we need to press the join condition button. Now by clicking the CHECK button Ensure that you get the message below -As Define Join conditions are correct.
Once you get this message in the bottom of the screen then you can go back by clicking back button.
Note: Ensure that when you join more than one tables the Primary keys should have linkage as in the below case the field name “MATNR” is the primary key were it is linked in both the tables.
Primary key will have a symbol seen below. 
Now press check button.
After the check press the infoset button.
Once after clicking the infoset button the below screen appears in that choose the option “Create Empty Field Groups”
Once the above selection is been selected the below screen appears
In this drill down both the Tables then you get the Fields for each table in that select the fields which are required & Drag them to the Right hand side to their respective tables.
Then you can see in the below screen in that what fields I have selected are displayed.


After doing the above process save the settings by clicking the button SAVE. After saving click the GENERATE button to generate the settings. And go back.
Now click the button ROLE / USER GROUP ASSIGNMENT in the main screen to assign the Role. The Below screen appears, in that Activate the Assigned table against the User Group name “HARUGRP”
 After doing the above process Click the save button for saving the settings.
After saving the settings you can see the below screen in the main screen. After completing the task check for consistency by clicking the check button in the Main screen. Ensure that you get the below message
Infoset HARISET has no consistencies
Now go to T.Code : SQ01
Initial Screen of SQ01 is displayed below. In this screen you can find your user group name automatically. Do not mention the query name just click on infoset query button.
In that choose the infoset “HARISET” which was created in the Transaction SQ02 then you get the below screen. Now press ok.
After selecting the InfoSet below screen appears.
If you drill down then the selected fields would get display which was selected when creating the Info Set Query.
Ensure the Output & the Selection Fields are in VALUE & Not in TEXT. If it is a TEXT then in the screen in the menu bar you have “EDIT” option in that select “SETTINGS” the below screen comes in that ensure the Selection & the output is in VALUES.

In the Output tab ensure the Type of Output list as “BASIC LIST” & the Type of Output as “SAP LIST VIEWER”
In the Default: Val/Text Tab ensure for the Output & Selection the “VALUE” radio button is selected
Now when you Save it will show a screen with the name and title along with the user group name, just press ok and go back.
Query is created automatically
After you go back to the main screen in that you select the other user group button if you have to assign the same query for any other user group which is used for changing the User group.

Once after Selecting the User group the below screen appears.
Give the parameters as required and press execute.
Find the list as below.
In this if you want to transfer the data’s to an Excel file then click the button preview button beside the print button in this you can choose your format to transport the data’s from
SAP list Viewer to whatever format you prefer.
If you want to make any changes then click the Change button with the selected Query in SQ01.

No comments:
Post a Comment